Modern smartphones hold untapped potential for specialized imaging applications. Most devices contain sensors capable of detecting infrared light, though manufacturers intentionally block this capability for safety reasons. By modifying these components and integrating intelligent software, users can unlock accessible thermal imaging technology without professional-grade equipment.
Standard digital imaging systems use protective filters to prevent infrared light from reaching sensors. Removing these barriers requires precision but reveals hidden visual data. This process preserves the device’s structural integrity when performed correctly, transforming ordinary hardware into a powerful diagnostic tool.
Advanced AI applications refine raw infrared data into actionable thermal visuals. These programs compensate for hardware limitations, delivering clearer results than basic modifications alone. Practical applications range from detecting heat leaks in buildings to troubleshooting electronics with pinpoint accuracy.
Safety remains critical throughout the modification process. Proper preparation minimizes risks to both users and devices. With careful execution, this project demonstrates how cutting-edge technology becomes accessible through creative problem-solving and software innovation.
Understanding Infrared and Thermal Imaging Basics
Light extends far beyond what human eyes perceive. The electromagnetic spectrum includes infrared wavelengths that emit heat signatures. These invisible rays range from 700 nanometers to 1 millimeter, carrying thermal data standard photography ignores.
Infrared Spectrum and Sensor Sensitivity
Smartphone sensors detect near-infrared light naturally. CCD and CMOS components respond to wavelengths up to 1100 nanometers. This capability remains unused in everyday photography due to factory-installed infrared-blocking filters.
Spectral sensitivity curves determine which wavelengths a sensor captures. Modifying these parameters allows devices to visualize heat patterns. Different nanometer filters alter results, enabling applications like detecting faulty wiring or energy leaks.
The Function of Infrared Blocking Filters
Manufacturers add these filters to protect sensors and ensure color accuracy. Without them, prolonged exposure to infrared light could damage components. Removing the barrier unlocks heat detection but requires precise calibration for reliable thermal imaging outputs.
Material properties affect infrared penetration. Glass reflects certain wavelengths, while plastics transmit them. Understanding these interactions helps interpret thermal visuals accurately, similar to professional-grade diagnostic tools.
Android thermal camera DIY: Converting Your Phone
Converting everyday gadgets into diagnostic tools starts with understanding their internal components. This process requires methodical preparation and precise execution to achieve reliable results. Proper device selection and workspace organization form the foundation for successful hardware modifications.
Preparing Your Device for Modification
Begin with selecting a compatible device. Models with easily accessible imaging components simplify the modification process. High-performance processors ensure smooth operation of thermal analysis software later.
Workspace setup proves equally critical. Use anti-static mats and wrist straps to prevent electrical damage. Precision tools like micro screwdrivers protect delicate parts during disassembly.
Disassembling and Reconfiguring the Camera
Accessing the imaging sensor requires careful removal of the device’s rear casing. Identify the flex cable connecting the module to the motherboard before proceeding. Gentle pressure releases these connectors without damaging pins.
The critical stage involves extracting the infrared-blocking filter. This thin, colored glass sits near the collimating lenses. Specialized tools lift it from its housing while preserving adjacent optical elements.
Reassembly demands meticulous attention to alignment. Ensure all lenses sit flush in their original positions. A dust-free environment maintains optical clarity, crucial for achieving high-resolution thermal readings post-modification.
Integrating AI Filters for Enhanced Imaging
Sophisticated software transforms raw sensor data into actionable insights. Open-source applications outperform proprietary alternatives by offering advanced processing without system privileges. These tools work across platforms, including Linux environments, while maintaining user-friendly interfaces.
Selecting the Right AI Software Tools
Prioritize programs with real-time analysis and machine learning integration. Compatibility with modified devices ensures seamless data interpretation. Look for features like multi-layer filtering and temperature gradient mapping.
Offline post-processing modes enable detailed analysis on larger screens. This flexibility helps identify subtle heat patterns in captured snapshots. Superior apps provide interpolation tools to enhance low-resolution outputs.
Customizing Filter Settings for Optimal Clarity
Adjustable parameters let users refine visual outputs for specific scenarios. Configurable sensitivity settings improve detection accuracy in varying environments. Temperature range sliders help isolate critical heat signatures.
Color palette customization enhances visual interpretation. Choose high-contrast schemes for quick diagnostics or subtle gradients for detailed analysis. Noise reduction algorithms automatically clean up grainy visuals while preserving essential data points.
Step-by-Step Modification Process
Precision transforms standard devices into specialized tools through systematic adjustments. This guide details the critical phases of hardware reconfiguration, emphasizing component safety and optical alignment for reliable performance.
Removing the CCD Sensor and Infrared Filter
Begin by disconnecting the ribbon cable linking the image sensor to the motherboard. Use plastic spudgers to avoid scratching delicate connectors. Gently lift the lens mechanism after removing its mounting screws, noting spring-loaded parts that require careful handling.
Separate the collimating lenses from the sensor assembly using precision tweezers. Locate the reddish filter nestled between optical elements. Pry it free with a flat-tip screwdriver, maintaining steady pressure to prevent glass shattering.
Reassembling the Camera with Updated Components
Clean all surfaces with compressed air before reinstalling lenses. Align the remaining optical stack precisely to preserve focus capabilities. Secure each component in reverse order of removal, ensuring no dust enters the housing.
Test the modified system by capturing heat signatures from common sources like electronics or sunlight. Adjust software settings to enhance resolution if initial outputs appear grainy. Successful modifications display clear temperature variations without color distortion.
Exploring Practical Applications of DIY Thermal Imaging
Modified devices unlock powerful diagnostic capabilities for residential and commercial spaces. Users gain access to visual heat data that reveals hidden structural and mechanical issues. This technology empowers property owners to address problems before they escalate into costly repairs.
Identifying Home Insulation and Electrical Issues
Energy efficiency improvements start with detecting temperature variations in walls and attics. Modified systems pinpoint insulation gaps and air leaks around windows through color-coded heat maps. These visualizations help prioritize sealing efforts to reduce utility bills.
Electrical systems benefit from non-invasive analysis. Overloaded circuits and loose connections generate distinct heat signatures. Early detection prevents potential fire hazards by identifying hotspots in breaker panels or wiring junctions.
HVAC performance optimization becomes straightforward with thermal scans. Ductwork leaks and blocked vents create uneven temperature distribution across rooms. Adjusting airflow based on these findings ensures balanced heating and cooling throughout living spaces.
Structural assessments reveal moisture intrusion and hidden framing elements behind walls. Temperature differences expose water damage and thermal bridging in building materials. This data supports informed decisions about repairs or renovations.
For complex issues, preliminary scans provide valuable evidence for professional inspectors. Homeowners can document problem areas before scheduling expert evaluations, streamlining the diagnostic process.
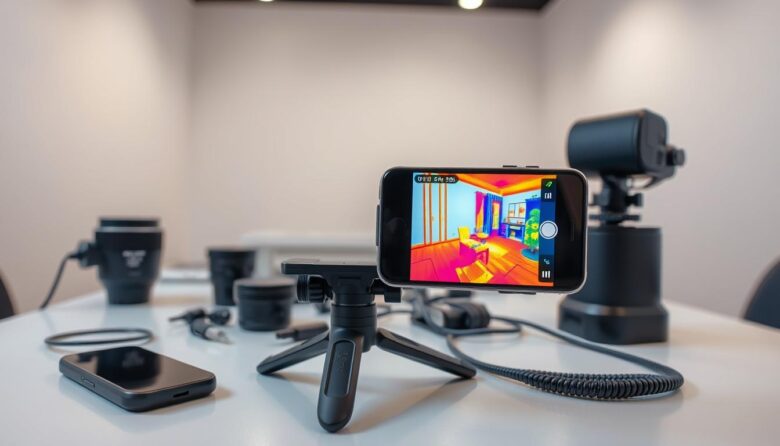
Performance Analysis and Sample Outputs
Testing modified imaging systems reveals their true capabilities in practical scenarios. The setup captures temperature variations with surprising clarity, even when analyzing small electronic components. Users can document heat patterns through high-resolution photos and video streams unavailable in commercial alternatives.
Evaluating Captured Images and Video Quality
Modified devices achieve 1080p thermal video recording – a feature rarely found in professional systems. This resolution captures rapid temperature changes during electronic diagnostics. For example, a heated soldering iron shows precise heat dissipation patterns frame-by-frame.
Still images reveal hidden details like integrated circuit markings on congested boards. The system detects subtle heat differences between components, exposing active elements in devices like Logitech Harmony Hubs. Color gradients help distinguish temperature variations as small as 2°C.
Comparing Standard and Modified Thermal Outputs
Standard photography misses critical data visible through infrared analysis. A green laser pointer’s invisible infrared emissions become clearly trackable. RFID tags appear translucent, revealing internal structures blocked by surface materials.
Commercial thermal cameras often sacrifice resolution for affordability. Modified systems outperform them in spatial detail, capturing component numbers on circuit boards. This precision aids technicians in identifying faulty parts without disassembling devices.
Real-world tests demonstrate unique advantages. USB lighters display heat distribution maps more accurately than unmodified tools. Proximity sensors show activation patterns through thermal signatures, proving invaluable for electronic troubleshooting.
Troubleshooting and Optimization Tips
Technical challenges often surface when refining modified imaging systems. Addressing hardware and software issues ensures reliable performance while maintaining measurement accuracy. Proactive adjustments help users maximize their device’s capabilities across various applications.
Common Pitfalls and How to Fix Them
Damaged ribbon cables during disassembly create connectivity issues. Replace torn connectors using precision tools and anti-static equipment. Misaligned optical components cause blurry outputs – realign lenses using manufacturer diagrams for reference.
Contaminated sensors produce permanent spots in thermal images. Clean surfaces with compressed air before reassembly. For software conflicts, update applications to versions matching your operating system. Lower resolution settings if older processors struggle with 25FPS video streams.
Calibration establishes accurate temperature measurements. Use household items like ice water as reference points. Adjust sensitivity settings when scanning electronics versus building materials. Most apps support horizontal/vertical plotting rulers to isolate specific heat signatures.
Optimize frame rates based on usage needs. Reduce from 25FPS to 15FPS for extended sessions to prevent overheating. Configure color palettes through app settings to highlight critical temperature thresholds. Pair with external probes via USB for professional-grade analysis.
Regular maintenance preserves image quality. Clean lens surfaces monthly and update software filters quarterly. Store modified devices in dust-proof cases to protect exposed components. These practices ensure consistent performance across residential and industrial applications.
Wrapping Up Your Thermal Imaging Journey
Cost-effective innovation brings professional-grade diagnostic tools within everyone’s reach. Building a functional imaging system for under $10 – compared to $200 commercial alternatives – demonstrates how creativity and open-source solutions democratize advanced technology.
The modified setup captures 1080p video and high-resolution stills, outperforming many budget-friendly devices. Customizable software transforms raw data into detailed heat maps for home energy audits or electronics troubleshooting. Users gain precision tools without sacrificing affordability.
Future enhancements could integrate environmental sensors or machine learning for industrial applications. Active developer communities continually refine codebases, expanding capabilities through shared knowledge and modular updates.
Professionals across fields now access thermal analysis for building inspections, mechanical diagnostics, and research projects. While DIY systems excel for routine tasks, critical applications still require commercial-grade equipment for certified accuracy.
This project cultivates technical skills while contributing to collaborative innovation. By sharing modifications and results, enthusiasts help shape the next generation of accessible imaging solutions.