Modern mobile devices hold untapped potential for home automation. This step-by-step guide reveals how to unlock infrared functionality using everyday components. With basic tools like a 3.5mm audio cable and simple electronics, users gain command over TVs and appliances through invisible light signals.
Infrared technology powers most home entertainment systems. Traditional remotes use specific wavelengths to communicate with devices. This project recreates that capability through a custom-built transmitter that plugs into standard audio jacks.
The process requires minimal technical skills but delivers professional results. A completed device offers universal control without expensive hardware. Users save money compared to store-bought universal remotes while learning practical electronics principles.
Essential materials include two infrared LEDs and heat-shrink tubing for insulation. Soldering creates durable connections between components. Detailed instructions ensure safe assembly even for first-time builders.
This article explains the science behind wireless signal transmission. It bridges theoretical concepts with hands-on implementation. Readers will master light-based communication protocols that make modern conveniences possible.
Understanding Infrared Technology and Remote Control Basics
Many household electronics rely on invisible communication methods to operate. Infrared technology powers this hidden language through light waves just beyond human vision. This system enables devices to receive commands without physical connections.
What is Infrared (IR) Technology?
Infrared exists between visible light and microwaves in the electromagnetic spectrum. These invisible light waves carry encoded messages through rapid flashes. Common applications include temperature sensors and night vision equipment.
Home electronics use specific infrared frequencies for reliable communication. Unlike radio-based systems, IR requires direct pathways between transmitters and receivers. This limitation prevents signal interference between nearby devices.
How IR-Based Remote Controls Work
Traditional controllers convert button presses into unique light patterns. Each command – like power toggle or volume adjustment – has distinct pulse sequences. Receivers decode these flashes using specialized sensors.
Modern android phones with built-in emitters replicate this functionality. Models like POCO X4 Pro and OnePlus 11R feature dedicated hardware at their tops. These components mimic standard remotes through compatible apps.
Universal control systems bridge compatibility gaps between manufacturers. Users can operate multiple electronics through single interfaces. This approach eliminates clutter while maintaining precise command execution.
Gathering the Required Tools and Materials
Successful device creation begins with proper preparation and component selection. This phase determines how smoothly the assembly process unfolds and ensures reliable performance. Collecting precise parts prevents delays and technical issues during construction.
Essential Parts for the Project
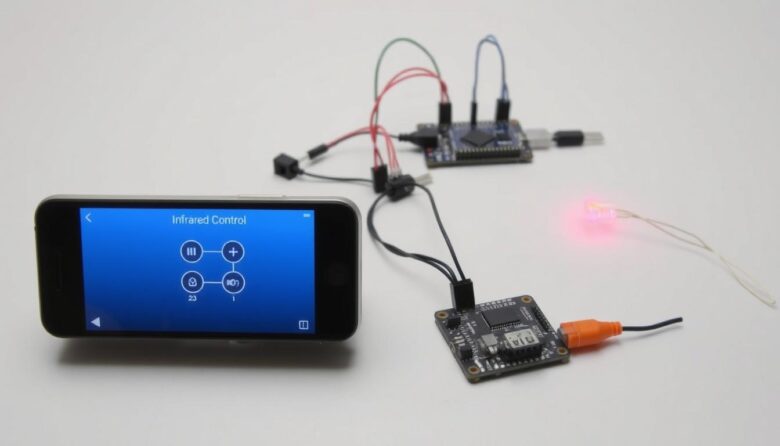
A standard 3.5mm audio cable serves as the command link between your phone and target devices. Two infrared LEDs with 940nm wavelength provide optimal signal strength. The long metal lead on each LED marks the positive terminal – a critical detail for proper circuit alignment.
Heat-shrink tubing insulates connections, while a low-wattage soldering iron (15-30W) ensures safe metal bonding. A hot glue gun adds strain relief at cable joints. These components work together to create a durable remote control transmitter.
Tips for Soldering and Safe Assembly
Always solder in well-ventilated areas to avoid inhaling fumes. Use helping hands or clamps to stabilize components during the step-by-step guide process. Apply heat for 2-3 seconds per joint to prevent overheating delicate parts.
Connect LEDs in series by attaching the positive lead of one to the negative terminal of the other. This configuration maximizes output without exceeding standard audio jack power limits. Double-check connections with a multimeter before final assembly.
Organize tools beforehand to maintain workspace efficiency. Keep a fire-resistant surface nearby for hot equipment. These tips reduce errors and ensure consistent results across various home electronics.
Step-by-Step Guide: Building Your Smartphone IR Blaster DIY
Crafting a custom transmitter transforms ordinary devices into versatile controllers. This step-by-step guide simplifies creating a powerful tool using accessible components. Follow these precise instructions to assemble a reliable signal emitter.
Preparing the 3.5mm Aux Cable and IR LEDs
Start by stripping 1 inch of insulation from the audio cable’s tip. Identify the ground wire (usually copper) and two signal wires (often red/white). Test LED functionality using a 1.5V battery before assembly.
Trim LED leads to ¼ inch for easier handling. Mark positive terminals with colored tape to prevent confusion. Proper preparation ensures smooth progress through subsequent stages.
Connecting the LEDs in Series
Link the first LED’s positive lead to the second’s negative terminal. Attach the remaining leads to corresponding audio cable wires. This series circuit configuration optimizes power distribution from mobile devices.
Secure connections with minimal solder to avoid short circuits. Apply heat-shrink tubing over each joint for insulation. Double-check polarity before finalizing the assembly.
The completed transmitter pairs with free apps for remote control functionality. This method provides cost-effective command over multiple electronics through one compact device.
Connecting Your Custom IR Blaster to Your Phone
The final integration phase transforms individual components into a functional system. Proper assembly ensures reliable operation across various electronics. This stage bridges hardware creation with practical application through precise technical alignment.
Securely Attaching the Components
Insert the 3.5mm connector fully into the audio jack until it clicks. Wiggling connections indicate improper seating – reseat firmly if needed. Apply hot glue sparingly at the cable base to prevent accidental disconnections.
Position LEDs at the top of your mobile device for clear signal paths. Secure components with adhesive strips while maintaining accessibility. Test mechanical stability by gently tugging cables before final use.
Ensuring Optimal Signal Transmission
Maintain direct line-of-sight between emitters and target devices. Ideal operating range stays under 20 feet for consistent performance. Avoid placing obstructions like glass surfaces or decorative items in the signal path.
Test functionality using universal remote apps before permanent assembly. Adjust LED angles if receivers don’t respond to commands. Bright ambient light may interfere – dim room lighting during initial calibration for best results.
Exploring Remote Control Apps for Enhanced Functionality
Custom-built hardware becomes truly powerful when paired with the right software. This section examines the digital tools that transform your creation into a versatile command center. Proper app selection ensures seamless operation across modern entertainment systems.
Setting Up the ZAZA Remote App
The ZAZA Remote App unlocks universal remote capabilities for your transmitter. After installation, navigate to Advanced Settings and adjust two critical parameters. Set Macro key sending gap to 1000 MS for reliable signal timing and enable audio reversal for hardware compatibility.
Alternatives and Tips for App Customization
Android users can explore Twinone Universal TV Remote or SURE Universal Remote from the Google Play Store. Xiaomi device owners often find pre-installed Mi Remote Controller works effectively. For advanced users, irplus – Infrared Remote offers granular control over button layouts and function assignments.
Optimize performance by testing different apps with your specific TV models. Maintain app updates for improved smart TVs compatibility and security patches. Most control apps require microphone permissions to interpret audio jack signals – verify developer credibility before granting access.